This repository provides a robust N8N workflow to reliably backfill historical Google Analytics 4 (GA4) data into Google BigQuery. It serves as a more accessible, automated, and no-code alternative to the previous Python-based backfill solution, offering easier authentication, superior automation, and built-in status monitoring.
- Why This Workflow Exists
- Features
- How to Use
- Execution Strategy
- Reports Schema
- Customization
- Contact & Support
The native BigQuery export for GA4 is a powerful tool, but it has significant limitations. It only includes raw event-stream data from the moment you enable the connection, leaving a critical gap: no historical data.
This is a major issue for any organization needing long-term analysis. Furthermore, the raw export lacks crucial, pre-processed data that is only available through the GA4 Reporting API. Key examples include:
- Audiences and Segments: Data pre-aggregated by the audiences you've defined in the GA4 UI.
- Blended & Observed Reporting Identity: GA4's best-effort attempt to deduplicate users across devices and browsers, which is not present in the raw export.
- Attribution Modeling: Data processed according to your chosen attribution models.
- Calculated Metrics: Key metrics like
engagementRate, which are readily available in the API but require complex calculations to derive from raw data.
While Google's own Data Transfer Service exists, it has proven to be unreliable and buggy for many users. This N8N workflow directly addresses these gaps by pulling clean, aggregated report data via the GA4 API. This allows you to blend rich, processed report data with your raw event stream in BigQuery for a complete and powerful analytical picture.
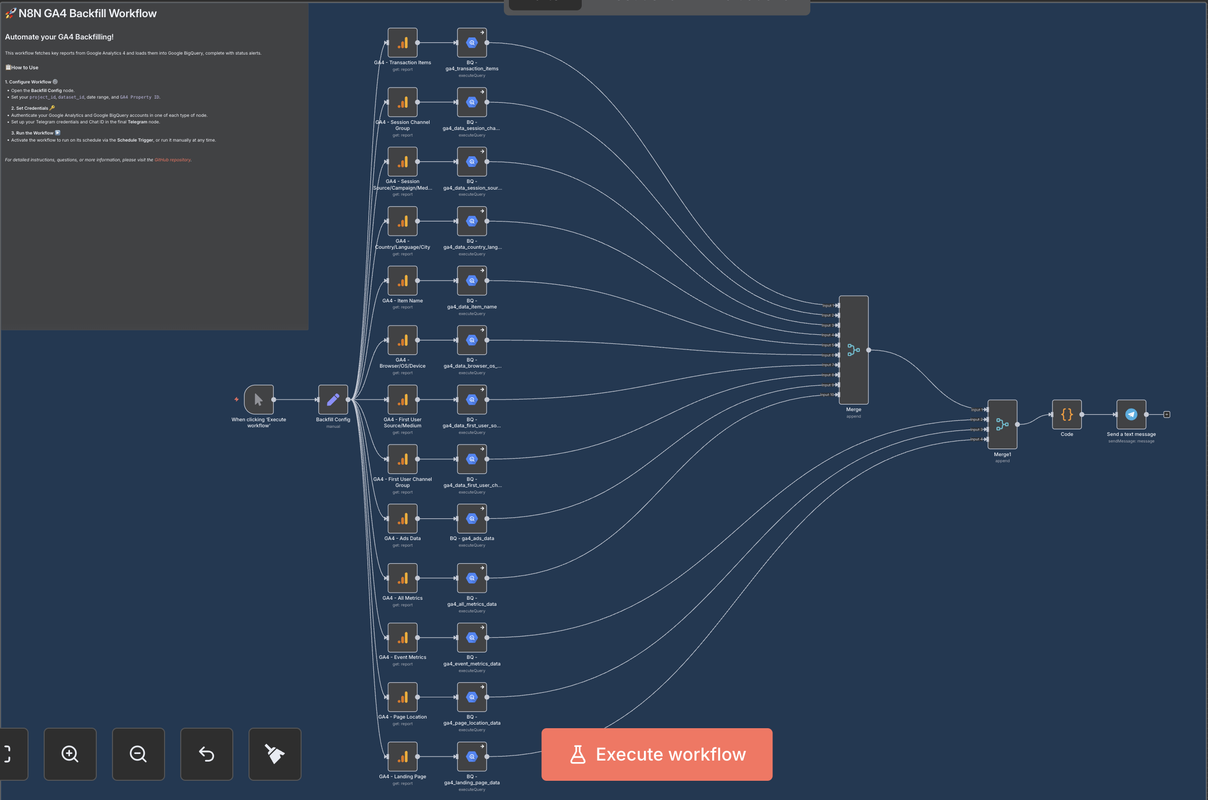
This N8N workflow provides a robust, visual, and automated solution:
- Automated Reporting: Fetches 13 pre-configured, essential GA4 reports in parallel.
- Dynamic BigQuery Tables: Automatically creates (or replaces) tables in BigQuery for each report, stamped with the execution date range.
- No-Code Customization: Easily add new reports, change dimensions/metrics, or modify table schemas directly in the visual editor without writing any code.
- Flexible Execution: Run the workflow on-demand for historical backfills or set it on a daily schedule for continuous updates.
- Status Notifications (Optional): Integrated Telegram alerts provide a summary of successful and failed queries after each run.
- Secure & Simple Authentication: Uses standard OAuth for Google services, managed directly within N8N, eliminating the need for complex service account setups.
- A running N8N instance (self-hosted or cloud). See the official N8N setup guide for instructions.
- A Google Cloud Platform project with the BigQuery API enabled and a billing account attached.
- (Optional) A Telegram account and a bot token if you wish to use the notification feature.
- Download the Workflow: Download the appropriate
.jsonfile from this repository. - Import to N8N: In your N8N instance, go to
New Workflow->Import from Fileand select the downloaded file. - Configure the
Backfill ConfigNode: This is the central control panel for the workflow.GA4 Property ID: Your Google Analytics 4 property ID.project_id: Your Google Cloud Project ID where BigQuery is located.dataset_id: The BigQuery dataset where tables will be created.startDate&endDate: Define the date range for the data you want to fetch. You can use:- Static Dates:
2024-01-01 - Dynamic Expressions:
{{ DateTime.now().minus({ days: 30 }).toFormat('yyyy-MM-dd') }}
- Static Dates:
- Set Credentials:
- Google (GA4 & BigQuery): Open any
GA4 - ...orBQ - ...node and create or select your Google credentials. You only need to do this once. For a detailed guide, see the N8N Google OAuth documentation. - Telegram (Optional): Open the final
Send a text messagenode and create or select your Telegram credentials. You must also provide the destinationChat ID. For help, see the N8N Telegram documentation.
- Google (GA4 & BigQuery): Open any
This repository contains two workflow files to support two primary use cases.
Use the N8N-GA4-Backfill-Workflow.json file for your initial, large-scale backfill.
- In the Backfill Config node, set
startDateandendDateto cover the full historical period you need. - Manually execute the workflow by clicking "Execute Workflow".
- This workflow creates table names with both start and end dates (e.g.,
..._20230101_20241231), which is ideal for one-off historical loads.
After the initial backfill, switch to the N8N-GA4-Backfill-Workflow-Daily-Update.json file for daily runs. This version creates daily sharded tables, which is the standard and most efficient way to manage ongoing time-series data in BigQuery.
Recommendation: Configure the Schedule Trigger to run daily. Set the dates in the Backfill Config node with a 2-day lag, as GA4 data can take up to 48 hours to be fully processed and finalized.
startDate:{{ DateTime.now().minus({ days: 2 }).toFormat('yyyy-MM-dd') }}endDate:{{ DateTime.now().minus({ days: 2 }).toFormat('yyyy-MM-dd') }}
The following table details the 13 reports fetched by this workflow.
| BigQuery Table Name | Dimensions | Metrics |
|---|---|---|
ga4_transaction_items |
transactionId, itemName, date |
itemPurchaseQuantity, itemRevenue |
ga4_data_session_channel_group |
date, sessionDefaultChannelGroup |
sessions, totalUsers, newUsers, ecommercePurchases, purchaseRevenue |
ga4_data_session_source_campaign_medium |
date, sessionSource, sessionCampaignName, sessionMedium |
sessions, totalUsers, newUsers, ecommercePurchases, purchaseRevenue |
ga4_data_country_language_city |
date, country, language, city |
sessions, screenPageViews, totalUsers, newUsers, ecommercePurchases, purchaseRevenue |
ga4_data_item_name |
date, itemName |
itemPurchaseQuantity, itemRevenue |
ga4_data_browser_os_device |
date, browser, operatingSystem, deviceCategory |
sessions, screenPageViews, totalUsers, newUsers, ecommercePurchases, purchaseRevenue |
ga4_data_first_user_source_medium |
date, firstUserMedium, firstUserSource, firstUserCampaignName |
totalUsers, newUsers, ecommercePurchases, purchaseRevenue |
ga4_data_first_user_channel_group |
date, firstUserDefaultChannelGroup |
totalUsers, newUsers, ecommercePurchases, purchaseRevenue |
ga4_ads_data |
date, sessionSource, sessionMedium, sessionCampaignName |
ecommercePurchases, averagePurchaseRevenue, purchaseRevenue, advertiserAdClicks, advertiserAdCost, advertiserAdCostPerClick, returnOnAdSpend |
ga4_all_metrics_data |
date |
sessions, totalUsers, userEngagementDuration, newUsers, engagementRate, engagedSessions, screenPageViews, purchaseRevenue, ecommercePurchases |
ga4_event_metrics_data |
date, eventName |
eventCount, eventCountPerUser, eventValue |
ga4_page_location_data |
date, pageLocation |
totalUsers, ecommercePurchases, purchaseRevenue, screenPageViews, eventCount, engagementRate |
ga4_landing_page_data |
date, landingPage |
totalUsers, sessions, eventCount, ecommercePurchases, engagementRate, purchaseRevenue |
The power of this workflow is its flexibility. You can easily adapt it to your needs:
- Add New Reports: Clone any of the existing
GA4 -> BQbranches, change the dimensions and metrics in the GA4 node, and update the schema in the BigQuery node's SQL query. - Change Table Names: Simply edit the table name in the
CREATE OR REPLACE TABLEandINSERT INTOstatements within the BigQuery nodes. - Modify Notifications: Edit the
Codenode to change the summary message. You can also replace the Telegram node with a Slack, Discord, or Email node to send alerts to your preferred platform. - Alter the Trigger: Change the Schedule Trigger to a Webhook Trigger to run the workflow based on an external event.
For questions, issues, or suggestions for improvement, please open an issue in this GitHub repository.